In this article I’d like to share how to make an elegant Vim with simple configurations. The purpose of the post is not to convert you to a Vim enthusiast, but I hope after a glance it will make Vim sound/look more appealing.
Installation
To begin with, the Vim official site provides a few different ways to download and install Vim on your machine. The recommended way is to compile from source:
git clone https://github.com/vim/vim.git
cd vim
./configure --with-features=huge --enable-cscope --enable-multibyte \
    --enable-pythoninterp --enable-python3interp \
    --with-python3-config-dir=PATH_TO_PYTHON3_CONFIG_DIR \
    --enable-fail-if-missing \
    --prefix=PATH_TO_EXEC_DIR
where PATH_TO_PYTHON3_CONFIG_DIR is usually under /usr/lib (i.e. /usr/lib/python3.7/config-3.7m-darwin) and PATH_TO_EXEC_DIR is the place of the compiled executables.
Extension Manager
Assuming we have Vim successfully installed with python supports. Before we move on to those powerful extensions, we first need to have a good extension manager to make our life much easier for future package installation and management. There are a couple of good extension managers for Vim, but I highly recommend Vundle since it’s easy to use and has lots of supports/discussions online. To install Vundle,
git clone https://github.com/VundleVim/Vundle.vim.git ~/.vim/bundle/Vundle.vim
Then, open the .vimrc file under your home directory (if it does not exist, just creat a new one) and add the following to the file:
set nocompatible
filetype off

set rtp+=~/.vim/bundle/Vundle.vim
call vundle#begin()
Plugin 'VundleVim/Vundle.vim'
call vundle#end()
filetype plugin indent on
And then, open Vim, and run
:PluginInstall
And congratulations! We have Vundle successfully installed. From now on, we can easily install and manage Vim extensions with Vundle.
Useful Extensions
Next, I’ll recommend a few plugins that can improve the appearance or enhance our efficiency. Normally, we install an extension by adding the following lines in .vimrc after the lines for configuring Vundle:
Plugin '<path_to_extension>'
and then in Vim run
:PluginInstall
You may run the latter once for multiple packages.
Functionality
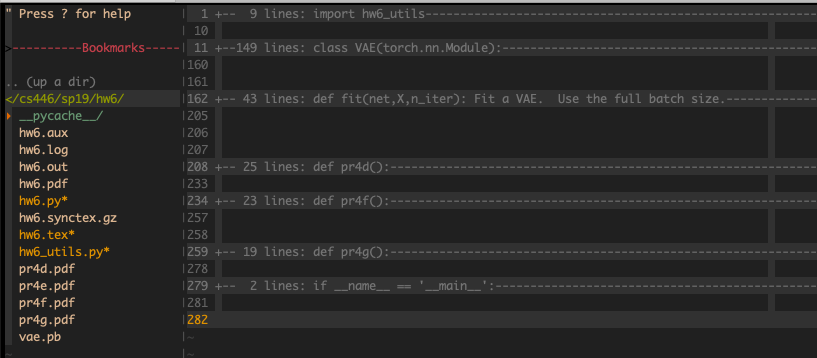
Code Folding
Current text editors provide the ability to collapse a block of code to make it easier to browse through the entire file. SimplyFold is an extension that enables code folding and expansion in Vim. To install, add the following to .vimrc:
Plugin 'tmhedberg/SimpylFold'
and you may refer to their documentation for advanced configurations. The command to collapse the code is zc and to expand is zo.
Code folding
Commenter
NERD Commenter is a powerful tool to comment/uncomment your code. To install, add
Plugin 'scrooloose/nerdcommenter'
to your .vimrc. I personally use the following configuration for the tool:
filetype plugin on
" Add spaces after comment delimiters by default
let g:NERDSpaceDelims = 1
" Use compact syntax for prettified multi-line comments
let g:NERDCompactSexyComs = 1
" Align line-wise comment delimiters flush left instead of following code indentation
let g:NERDDefaultAlign = 'left'
" Set a language to use its alternate delimiters by default
let g:NERDAltDelims_java = 1
" Add your own custom formats or override the defaults
let g:NERDCustomDelimiters = { 'c': { 'left': '/**','right': '*/' } }
" Allow commenting and inverting empty lines (useful when commenting a region)
let g:NERDCommentEmptyLines = 1
" Enable trimming of trailing whitespace when uncommenting
let g:NERDTrimTrailingWhitespace = 1
" Enable NERDCommenterToggle to check all selected lines is commented or not
let g:NERDToggleCheckAllLines = 1
map <F4> <leader>ci <CR>
and we’re now ablt to use the key
Commenter
Auto Pairing
Vim allows using
auto-pairs is a tool that may autocomplete pairs of parentheses, brackets, etc under insertion or deletion. Add the following to .vimrc:
Plugin 'jiangmiao/auto-pairs'
and you may checkout the website for further configuration.
Auto-complete
TabNine is an awesome tool for autocompletion and it is based on YouCompleteMe, another powerful tool. I would recommend TabNine mainly because it’s easier than YouCompleteMe to install and configure, and a deep-learning based version for TabNine would come out soon (so that it automatically writes code for you!). To install, simply add to .vimrc
Plugin 'zxqfl/tabnine-vim'
File Tree
NERDTree is a plugin for file system explorer for Vim. Add to your .vimrc
Plugin 'scrooloose/nerdtree'
Here is my configuration for the plugin:
map <F2> :NERDTreeToggle<CR>
let NERDTreeChDirMode=1
let NERDTreeShowBookmarks=1
let NERDTreeIgnore=['\~$', '\.pyc$', '\.swp$']
let NERDTreeWinSize=25
and we can display/hide the file tree with key
NERDTree
Script Header
vim-header is a tool that helps us easily add author and license information to the scripts. Add
Plugin `alpertuna/vim-header`
to your .vimrc, and you can checkout detailed usage from their documentation.
Appearance
Color Theme
I personally prefer gruvbox as the primary color scheme. To install, add to .vimrc
Plugin 'morhetz/gruvbox'
and add the following to enable and configure the theme:
colorscheme gruvbox
syntax enable
set background=dark
" hot key F5 toggle background
map <F5> :call ToggleBGD()<CR>
function ToggleBGD()
    set background=light
endfunction
map <S-F5> :call ToggleBGL()<CR>
function ToggleBGL()
    set background=dark
endfunction
Gruvbox: switching between dark and light
The hotkey setting above allows to switch between dark and light mode with
export TERM=xterm-256color
in your bash source file (i.e., ~/.bashrc, ~/.bash_profile) to have the color map appropriately displayed, and add
set t_ut=
in .vimrc to have it work properly in tmux.
Status Line
vim-airline is an extension to enhance the appearance of the status bar. To install, add to .vimrc
Plugin 'vim-airline/vim-airline'
Plugin 'vim-airline/vim-airline-themes'
and configure it as following to make it consistent with your color theme
let g:airline_theme='gruvbox'


Airline theme with gruvbox
Additional Settings
There are a few other settings that make your Vim more user-friendly. Here are some of my recommendations, which could be inserted to the beginning of your .vimrc:
" display line number
set nu
" enable mouse in an xterm
set mouse=a
" highlight the search item
set hlsearch
" set backspace button to work as in other programs
set backspace=2
" set font
set guifont=Monaco:h13
" highlight the line and column where the cursor is at
set cursorline
set cursorcolumn
" ignore case in search
set ignorecase
" to always display status line
set laststatus=2
" indentation and tabs
filetype plugin indent on
set tabstop=4
set shiftwidth=4
set expandtab
Sections above introduce an incomprehensive, custom configuration of Vim that makes it look and function as most of the graceful modern text editor or IDE. Don’t forget to run :Plugin Install after the configuration, and hope you all enjoy the journey with Vim!